BLANTON’S SINGLE BARREL BOURBON REVIEW

photo credit: HeavenHillDistillery.com BLANTON’S SINGLE BARREL BOURBON Proof: 93 Age: 9 years old Blanton’s Distillery: Buffalo Trace Distillery Master Distiller: Elmer T. Lee Buy Bottle Blanton’s Bourbon is a true single barrel whiskey made right here in Bourbon country! You know Blanton’s […]

The post BLANTON’S SINGLE BARREL BOURBON REVIEW appeared first on Bourbon Of The Day.

Blanton’s-Bourbon-Single-Barrel

photo credit: HeavenHillDistillery.com

BLANTON’S SINGLE BARREL BOURBON

4.1/5 - (96 votes)

Proof: 93
Age: 9 years old
Blanton’s Distillery: Buffalo Trace Distillery
Master Distiller: Elmer T. Lee

Buy Bottle
Last Updated on January 26, 2021

Blanton’s Bourbon is a true single barrel whiskey made right here in Bourbon country! You know Blanton’s if you have seen it – it comes in one of the most beautiful liquor bottles on store shelves, and it has the distinguished horse on top. In actuality, Blanton’s comes with 8 different stoppers, each one featuring a rider in a different pose and a letter by his horses rear right leg. Each pose represents the rider in different positions during a race – from sitting upright at the start to his arm up in victory after crossing the finish line. Collect the whole set and B-L-A-N-T-O-N-S is spelled out. It takes a serious bourbon lover to collect enough to fill up one of those Blanton’s bourbon stopper display’s – but it can be done.

Ask me how I know!

Like most Kentucky bourbon, Blanton’s pays homage to its heritage by sporting the name of a bourbon patriarch – namely Colonel Albert Blanton. Blanton started out at Buffalo Trace back when it was the O.F.C. Distillery in 1897. He was there when George T. Stagg took over the operation in 1912, and worked his way through every position until he became President of the plant in 1921. It was Albert Blanton that hired on Elmer T. Lee, the man who would become the first Master Distiller of Buffalo Trace, and the man who would create the first single barrel bourbon, named after his old boss.

You might remember from our article on single barrel bourbon that a single barrel bourbon comes from one barrel that is hand picked by the Master Distiller. The Master finds barrels that are located in the sweet spot of a rick house, samples the barrel over time, and when it hits its peak, the Distiller and his hands bottle that barrel instead of blending it with other barrels. This might mean that some single barrels vary from bottle to bottle, rather than having the consistency of small batch bourbons.

Not always the case in our day and age of quality assurance, but sometimes things get interesting.

In the case of Blantons’ bourbon, Col. Blanton believed that the “center-cut” middle section of Warehouse H was the best location for aging his barrels. According to the Blanton, he would personally taste and pick barrels for friends and family members that met his standards. Elmer T. Lee would carry on this tradition after Col. Blanton died in 1959.

BLANTON’S SINGLE BARREL BOURBON TASTING NOTES

The first thing you should know about Blanton’s is that it comes from Buffalo Trace’s mash bill #4. That’s 75% corn, 15% rye, and 10% barley. The mash bill is one of the keys to bourbon flavor – but not the only factor. There is also the yeast strain that gives Blanton’s bourbon its nice fruity nose. I get apple, pear, and honeydew, along with strong vanilla and baking spices. Blanton’s smells so good, you could probably create a line of candles with it!

After 9 years in a barrel, the whiskey picks up some nice weight. The first sip has a medium heavy body that sticks to the tongue in a great way! Unlike younger bourbons, this is probably one of the smoothest bourbons you will ever have! That doesn’t mean this is a baby’s bourbon – at 93 proof, there is still plenty of heat to make you pay attention, but Blanton’s carries it well.

The taste shows the high rye mashbill – there is tons of spice and a deep, rich wood that remind me of fall (my favorite time of year)! I was pleasantly surprised by the fruit flavors in the glass as well. True to the nose, there is tons of orange and cherry in the middle of the taste.

Every true bourbon lover looks forward to the finish as much as the first sip, and Blanton’s has a dram good finish (see what I did there?)! Dry, bright, sweet, long lasting – this is a real sipper that you can sit back and enjoy from beginning to end!

OUR VERDICT

A

From the fantastic nose to the interesting taste and the long-lasting finish, I give Blanton’s bourbon a solid A.

Learn how we grade bourbons.

If you don’t like Blanton’s, you don’t like bourbon. I dare you to take a sip of this Kentucky brown water and not smile! Some of you might be turned off by the high price tag (Blanton’s bourbon price is around $50), but you get what you pay for! This is one of the top 10 bourbons on my list. Try it at the bar first, then head to a liquor store near you and grab yourself a bottle! If its good enough for the President, its good enough for you!

If you enjoyed this bourbon review, keep the conversation going! Tell us what you think by leaving a comment and a star rating below!

4.1/5 - (96 votes)
Last Updated on January 26, 2021

The post BLANTON’S SINGLE BARREL BOURBON REVIEW appeared first on Bourbon Of The Day.

BLANTON’S SINGLE BARREL BOURBON REVIEW

photo credit: HeavenHillDistillery.com BLANTON’S SINGLE BARREL BOURBON Proof: 93 Age: 9 years old Blanton’s Distillery: Buffalo Trace Distillery Master Distiller: Elmer T. Lee Buy Bottle Blanton’s Bourbon is a true single barrel whiskey made right here in Bourbon country! You know Blanton’s […]

The post BLANTON’S SINGLE BARREL BOURBON REVIEW appeared first on Bourbon Of The Day.
Blanton’s-Bourbon-Single-Barrel

photo credit: HeavenHillDistillery.com

BLANTON’S SINGLE BARREL BOURBON

4.1/5 - (96 votes)

Proof: 93
Age: 9 years old
Blanton’s Distillery: Buffalo Trace Distillery
Master Distiller: Elmer T. Lee

Buy Bottle
Last Updated on January 26, 2021

Blanton’s Bourbon is a true single barrel whiskey made right here in Bourbon country! You know Blanton’s if you have seen it – it comes in one of the most beautiful liquor bottles on store shelves, and it has the distinguished horse on top. In actuality, Blanton’s comes with 8 different stoppers, each one featuring a rider in a different pose and a letter by his horses rear right leg. Each pose represents the rider in different positions during a race – from sitting upright at the start to his arm up in victory after crossing the finish line. Collect the whole set and B-L-A-N-T-O-N-S is spelled out. It takes a serious bourbon lover to collect enough to fill up one of those Blanton’s bourbon stopper display’s – but it can be done.

Ask me how I know!

Like most Kentucky bourbon, Blanton’s pays homage to its heritage by sporting the name of a bourbon patriarch – namely Colonel Albert Blanton. Blanton started out at Buffalo Trace back when it was the O.F.C. Distillery in 1897. He was there when George T. Stagg took over the operation in 1912, and worked his way through every position until he became President of the plant in 1921. It was Albert Blanton that hired on Elmer T. Lee, the man who would become the first Master Distiller of Buffalo Trace, and the man who would create the first single barrel bourbon, named after his old boss.

You might remember from our article on single barrel bourbon that a single barrel bourbon comes from one barrel that is hand picked by the Master Distiller. The Master finds barrels that are located in the sweet spot of a rick house, samples the barrel over time, and when it hits its peak, the Distiller and his hands bottle that barrel instead of blending it with other barrels. This might mean that some single barrels vary from bottle to bottle, rather than having the consistency of small batch bourbons.

Not always the case in our day and age of quality assurance, but sometimes things get interesting.

In the case of Blantons’ bourbon, Col. Blanton believed that the “center-cut” middle section of Warehouse H was the best location for aging his barrels. According to the Blanton, he would personally taste and pick barrels for friends and family members that met his standards. Elmer T. Lee would carry on this tradition after Col. Blanton died in 1959.

BLANTON’S SINGLE BARREL BOURBON TASTING NOTES

The first thing you should know about Blanton’s is that it comes from Buffalo Trace’s mash bill #4. That’s 75% corn, 15% rye, and 10% barley. The mash bill is one of the keys to bourbon flavor – but not the only factor. There is also the yeast strain that gives Blanton’s bourbon its nice fruity nose. I get apple, pear, and honeydew, along with strong vanilla and baking spices. Blanton’s smells so good, you could probably create a line of candles with it!

After 9 years in a barrel, the whiskey picks up some nice weight. The first sip has a medium heavy body that sticks to the tongue in a great way! Unlike younger bourbons, this is probably one of the smoothest bourbons you will ever have! That doesn’t mean this is a baby’s bourbon – at 93 proof, there is still plenty of heat to make you pay attention, but Blanton’s carries it well.

The taste shows the high rye mashbill – there is tons of spice and a deep, rich wood that remind me of fall (my favorite time of year)! I was pleasantly surprised by the fruit flavors in the glass as well. True to the nose, there is tons of orange and cherry in the middle of the taste.

Every true bourbon lover looks forward to the finish as much as the first sip, and Blanton’s has a dram good finish (see what I did there?)! Dry, bright, sweet, long lasting – this is a real sipper that you can sit back and enjoy from beginning to end!

OUR VERDICT

A

From the fantastic nose to the interesting taste and the long-lasting finish, I give Blanton’s bourbon a solid A.

Learn how we grade bourbons.

If you don’t like Blanton’s, you don’t like bourbon. I dare you to take a sip of this Kentucky brown water and not smile! Some of you might be turned off by the high price tag (Blanton’s bourbon price is around $50), but you get what you pay for! This is one of the top 10 bourbons on my list. Try it at the bar first, then head to a liquor store near you and grab yourself a bottle! If its good enough for the President, its good enough for you!

If you enjoyed this bourbon review, keep the conversation going! Tell us what you think by leaving a comment and a star rating below!

4.1/5 - (96 votes)
Last Updated on January 26, 2021

The post BLANTON’S SINGLE BARREL BOURBON REVIEW appeared first on Bourbon Of The Day.
BOTTLED IN BOND OLD FOURTH DISTILLERY BOURBON REVIEW

BOTTLED IN BOND OLD FOURTH DISTILLERY BOURBON Proof: 100 Age: 4 Years Distillery: Old Fourth Distillery Head Distiller: Jeff Moore Taking the title of Atlanta’s first distillery in the city since 1906, Old Fourth Distillery was launched in 2014, by brothers Jeff and Craig […]

The post BOTTLED IN BOND OLD FOURTH DISTILLERY BOURBON REVIEW appeared first on Bourbon Of The Day.

BOTTLED IN BOND OLD FOURTH DISTILLERY BOURBON

Proof: 100
Age: 4 Years
Distillery: Old Fourth Distillery
Head Distiller: Jeff Moore

4.3/5 - (136 votes)

Taking the title of Atlanta’s first distillery in the city since 1906, Old Fourth Distillery was launched in 2014, by brothers Jeff and Craig Moore, along with Andy DuVall, Justin Gray, and Gabe Pilato.  They began by releasing their own vodka, gin, and then an experimental ginger lemon liqueur.  It was after these initial releases that they began working on their first bourbon.  In January of 2015, the distilling team barreled this bourbon where it’s been aging in a small warehouse in East Atlanta.  This first batch will have a very limited 2019 release of 75 barrels.  This 4-year aged straight whiskey bourbon has the bottled in bond label and is aged using white American oak barrels.

Bottled In Bond Label

For those of you bourbonites who don’t know the phrase ‘Bottled In Bond’ let me enlighten you.  Bottled in bond or bonded is a label used for American spirits that are distilled, aged, and bottled according to a set of legal regulations from within the United States government’s Standards of Identity for Distilled Spirits.  Congress originally outlined these regulations within the Bottled in Bond Act of 1897.  The purpose of the act was to create a standard of quality for bourbon whiskeys.

Before that time, the low quality of American whiskeys had become quite a problem.  Many “straight whiskeys” were being colored and flavored with iodine, tobacco, and other low-quality substances as a shortcut.  Therefore the demand for quality assurance arose and the Bottle-in-Bond Act was passed.

In order to gain the label bottled in bond or bonded, the spirit must be:

  • Produced by a single distillery, within a single season
  • Aged a minimum of 4 years within a federally bonded warehouse under the U.S. government’s supervision
  • Bottled at 100 proof (50% ABV)

Now that the history lesson is over let’s get to the bottle!

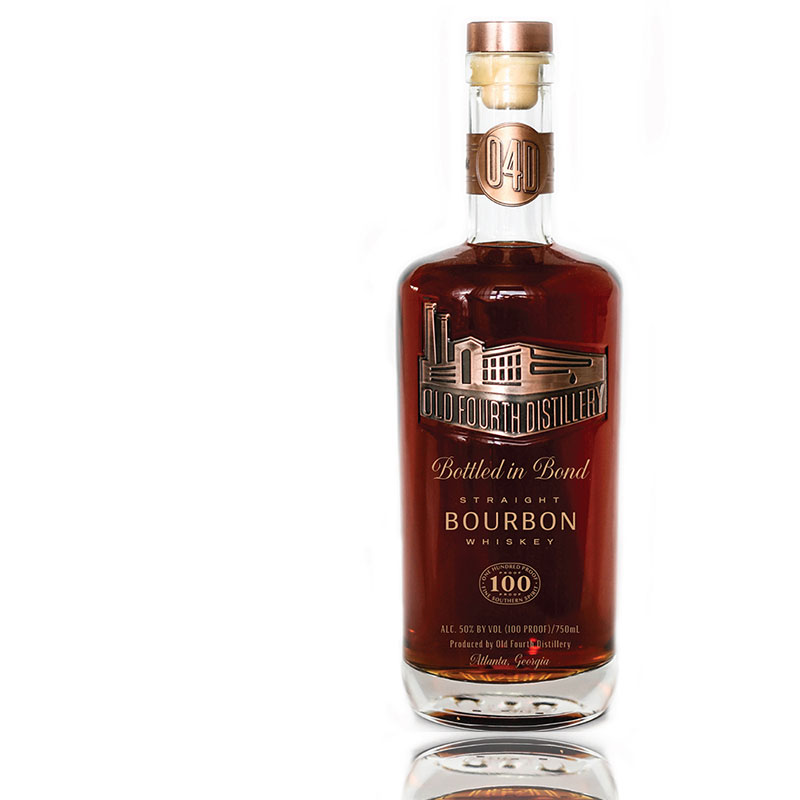
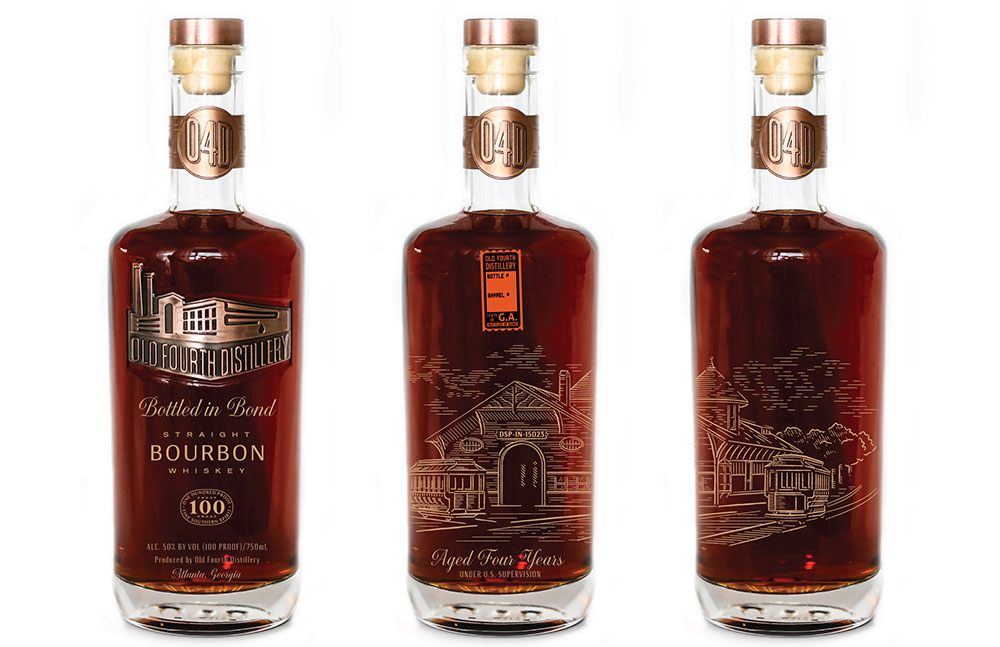
The first thing to note is this bourbon bottle’s design.  Lots of bourbon bottles have a certain reputation for eye-catchiness.  This one definitely qualifies.  Created by a local Atlanta artist, Bart Sasso, each bottle features a metallic O4D logo and image of the distillery.

A hand-drawn image of a trolley barn on Edgewood Avenue that at one time passed in front of Old Fourth Distillery, wraps around the side to the back of the bottle.

BOTTLED IN BOND OLD FOURTH DISTILLERY BOURBON TASTING NOTES

Now for what’s in the bottle.  The mashbill for this straight bourbon whiskey is made up of 75% Corn, 21% rye, and 4% malted barley.  The mashbill makes perfect sense to me, as this is a sweet tasting bourbon with a bit of that Rye bite to it.

The nose has a sweet undertone of honey, caramel, and vanilla that hides the fact that you’re about to drink a 100 proof bourbon.  The longer I held my nose in my glass, the more complex the scents became.  The sweet smell of honey, butterscotch, and hints of fruit give way to a welcome spiciness, that made my mouth water.

The first sips were very smooth on the front of my palette.  Then there’s more of the sweet flavor of caramel, butterscotch, and chocolate-cocoa.  After that, it builds into a more spicy dryness with a touch of warm charred oak in there.  Overall it’s very smooth whiskey that I would recommend drinking neat.  No need for any ice cubes or water here.

This bourbon has a dry, oak flavored finish that leaves a light sweetness lingering in your mouth.  I found myself enjoying the hell out of my glass of this bourbon.  If you’re a fan of those butterscotch candies that your grandmother gave you, then you’ll definitely enjoy this bourbon.

OUR VERDICT FOR BOTTLED IN BOND OLD FOURTH DISTILLERY BOURBON

A-

At the 2019 World Spirits Competition in San Francisco, Old Fourth Distillery earned a double gold for this Bottled in Bond 4-year single barrel bourbon.  In this case, I agree with their judgment.  For me, this bourbon earns a solid A-.  Both well-traveled bourbon drinkers, as well as newcomers, will be able to appreciate Old Fourth Distillery’s bourbon.  Unfortunately, you won’t be able to find this bourbon outside of Georgia from what I can tell.  However, if you happen to be in town, look up a place to find this bourbon and you won’t regret it.

At $50 a bottle, you may be turned off by the high price tag, but you get what you pay for!  My thought is to try it at the bar first, and if you like it as much as I did, then head to a liquor store somewhere in Georgia and grab yourself a bottle!  You better be quick though, because like I mentioned before, this first batch has a very limited 2019 release of 75 barrels.  So get it while you can!

Learn how we grade bourbons.

If you enjoyed this bourbon review, keep the conversation going! Tell us what you think by leaving a comment or a star rating below

4.3/5 - (136 votes)

The post BOTTLED IN BOND OLD FOURTH DISTILLERY BOURBON REVIEW appeared first on Bourbon Of The Day.

BOTTLED IN BOND OLD FOURTH DISTILLERY BOURBON REVIEW

BOTTLED IN BOND OLD FOURTH DISTILLERY BOURBON Proof: 100 Age: 4 Years Distillery: Old Fourth Distillery Head Distiller: Jeff Moore Taking the title of Atlanta’s first distillery in the city since 1906, Old Fourth Distillery was launched in 2014, by brothers Jeff and Craig […]

The post BOTTLED IN BOND OLD FOURTH DISTILLERY BOURBON REVIEW appeared first on Bourbon Of The Day.

BOTTLED IN BOND OLD FOURTH DISTILLERY BOURBON

Proof: 100
Age: 4 Years
Distillery: Old Fourth Distillery
Head Distiller: Jeff Moore

4.3/5 - (136 votes)

Taking the title of Atlanta’s first distillery in the city since 1906, Old Fourth Distillery was launched in 2014, by brothers Jeff and Craig Moore, along with Andy DuVall, Justin Gray, and Gabe Pilato.  They began by releasing their own vodka, gin, and then an experimental ginger lemon liqueur.  It was after these initial releases that they began working on their first bourbon.  In January of 2015, the distilling team barreled this bourbon where it’s been aging in a small warehouse in East Atlanta.  This first batch will have a very limited 2019 release of 75 barrels.  This 4-year aged straight whiskey bourbon has the bottled in bond label and is aged using white American oak barrels.

Bottled In Bond Label

For those of you bourbonites who don’t know the phrase ‘Bottled In Bond’ let me enlighten you.  Bottled in bond or bonded is a label used for American spirits that are distilled, aged, and bottled according to a set of legal regulations from within the United States government’s Standards of Identity for Distilled Spirits.  Congress originally outlined these regulations within the Bottled in Bond Act of 1897.  The purpose of the act was to create a standard of quality for bourbon whiskeys.

Before that time, the low quality of American whiskeys had become quite a problem.  Many “straight whiskeys” were being colored and flavored with iodine, tobacco, and other low-quality substances as a shortcut.  Therefore the demand for quality assurance arose and the Bottle-in-Bond Act was passed.

In order to gain the label bottled in bond or bonded, the spirit must be:

  • Produced by a single distillery, within a single season
  • Aged a minimum of 4 years within a federally bonded warehouse under the U.S. government’s supervision
  • Bottled at 100 proof (50% ABV)

Now that the history lesson is over let’s get to the bottle!

The first thing to note is this bourbon bottle’s design.  Lots of bourbon bottles have a certain reputation for eye-catchiness.  This one definitely qualifies.  Created by a local Atlanta artist, Bart Sasso, each bottle features a metallic O4D logo and image of the distillery.

A hand-drawn image of a trolley barn on Edgewood Avenue that at one time passed in front of Old Fourth Distillery, wraps around the side to the back of the bottle.

BOTTLED IN BOND OLD FOURTH DISTILLERY BOURBON TASTING NOTES

Now for what’s in the bottle.  The mashbill for this straight bourbon whiskey is made up of 75% Corn, 21% rye, and 4% malted barley.  The mashbill makes perfect sense to me, as this is a sweet tasting bourbon with a bit of that Rye bite to it.

The nose has a sweet undertone of honey, caramel, and vanilla that hides the fact that you’re about to drink a 100 proof bourbon.  The longer I held my nose in my glass, the more complex the scents became.  The sweet smell of honey, butterscotch, and hints of fruit give way to a welcome spiciness, that made my mouth water.

The first sips were very smooth on the front of my palette.  Then there’s more of the sweet flavor of caramel, butterscotch, and chocolate-cocoa.  After that, it builds into a more spicy dryness with a touch of warm charred oak in there.  Overall it’s very smooth whiskey that I would recommend drinking neat.  No need for any ice cubes or water here.

This bourbon has a dry, oak flavored finish that leaves a light sweetness lingering in your mouth.  I found myself enjoying the hell out of my glass of this bourbon.  If you’re a fan of those butterscotch candies that your grandmother gave you, then you’ll definitely enjoy this bourbon.

OUR VERDICT FOR BOTTLED IN BOND OLD FOURTH DISTILLERY BOURBON

A-

At the 2019 World Spirits Competition in San Francisco, Old Fourth Distillery earned a double gold for this Bottled in Bond 4-year single barrel bourbon.  In this case, I agree with their judgment.  For me, this bourbon earns a solid A-.  Both well-traveled bourbon drinkers, as well as newcomers, will be able to appreciate Old Fourth Distillery’s bourbon.  Unfortunately, you won’t be able to find this bourbon outside of Georgia from what I can tell.  However, if you happen to be in town, look up a place to find this bourbon and you won’t regret it.

At $50 a bottle, you may be turned off by the high price tag, but you get what you pay for!  My thought is to try it at the bar first, and if you like it as much as I did, then head to a liquor store somewhere in Georgia and grab yourself a bottle!  You better be quick though, because like I mentioned before, this first batch has a very limited 2019 release of 75 barrels.  So get it while you can!

Learn how we grade bourbons.

If you enjoyed this bourbon review, keep the conversation going! Tell us what you think by leaving a comment or a star rating below

4.3/5 - (136 votes)

The post BOTTLED IN BOND OLD FOURTH DISTILLERY BOURBON REVIEW appeared first on Bourbon Of The Day.

HOW TO MAKE BOURBON AT HOME: A GUIDE FOR MAKING GREAT WHISKEY

HOW TO MAKE BOURBON AT HOME: A GUIDE FOR MAKING GREAT WHISKEY ***Before we get started, let me get this out of the way: It is illegal to distill spirits at home. Not because it is dangerous to do so, but because over half the retail price of a bottle […]

The post HOW TO MAKE BOURBON AT HOME: A GUIDE FOR MAKING GREAT WHISKEY appeared first on Bourbon Of The Day.

HOW TO MAKE
BOURBON AT HOME:
A GUIDE FOR MAKING
GREAT WHISKEY

***Before we get started, let me get this out of the way: It is illegal to distill spirits at home. Not because it is dangerous to do so, but because over half the retail price of a bottle of distilled spirits consists of taxes.

Taxes on beer and wine are low compared to the very high taxes imposed on whiskey, vodka, gin, and all other distilled spirits, and the government doesn’t want to lose any of the many billions of dollars it receives each and every year by letting you make your own bourbon.  The law will come after you if they think you are making bourbon or any other spirits. Therefore, this article is for entertainment purposes only. It’s only wrong if you get caught.***

One of the most frequent questions we get from our Bourbon Of The Day email subscribers is whether its possible to make bourbon at home. Beer is going crazy right now, with previously unknown operations creating their own funky-named brews on a damned near daily basis.

While any old college kid can make a batch of stout, it takes a little more time, effort, and some specialized items to make bourbon at home. For starters, you may want to pick up a copy of  The Joy of Home Distilling. This book provides most of the information that you will find below.

If you want to go above and beyond the beer boys, roll up your sleeves and try your hand at making bourbon at home!

Browse By Step.  Click on any of these links to jump to the step you want to see:
Homemade Bourbon Recipe Ingredients
How To Make Bourbon Mash
Fermenting Your Bourbon Mash
Distilling Your Homemade Bourbon
Collecting Your Bourbon Distillate
Ageing Your Bourbon At Home

HOMEMADE BOURBON RECIPE INGREDIENTS

You will need a few items to pull this off – all of which are readily available online. Here is the shopping list I used.

BOURBON WHISKEY HARDWARE

HOMEMADE BOURBON MASH MIX

HOW TO MAKE BOURBON MASH

A mash is just that – grains mashed up into a nice primordial bourbon stew. To create your own bourbon mash, you will need some grain. A traditional bourbon mash combines corn, rye, and barley or wheat, so that’s what we will be using for our mash bill.

Play around with the grain ratio’s, but for instructional purposes, we recommend 70% corn, 15% rye, and 15% wheat (or 15% barley instead).  Using wheat will give your bourbon a more mild flavor profile.

Throw both the corn and rye grains into your Corona corn and grain mill. It will take three passes to get the mill texture that you are looking for.  You’ll add the barley or wheat mix separately from the other grains.

How To Make Bourbon Ingredients Rye
0%
RYE
How To Make Bourbon Ingredients Corn
0%
CORN
How To Make Bourbon Ingredients Wheat
0%
WHEAT

After you have your grains all pulverized, put 5.5 gallons of water into your 10-gallon brew pot.  Bring the water to boil at 212 degrees and turn off the heating source. Begin stirring in your grain mix.  Stir continuously for around 8 minutes.

After stirring check the temperature of the water every 30-60 seconds and once it reaches 150 degrees pour in your 1.5 lbs of barley or wheat.

Once the mixture gets to 86 degrees, add one pack of that distiller’s yeast while giving the mix a stir. Keep stirring for a few minutes to make sure the yeast is playing nice with your bourbon mash.

What you should be looking at is a nice pot full of dough-like substance that smells like cornbread.

FERMENTING YOUR BOURBON MASH 

Now its time to ferment! Put your mash into those two 5 gallon jugs or the fermentation bucket that you purchased above (you will have to split the mix up). Seal them up and put the jugs somewhere to ferment for about 2 weeks.

When 10 – 14 days have passed, grab your nut milk bags and strain the mixture into your copper still.

This is where the magic happens.

(…dum dum dum dum da da da dum dum dum…)

INTO YOUR BOURBON STILL KIT

The hard part is over, but you ain’t ready to get red-faced just yet.  You’ll need to use your cheesecloth to filter the solid mash ingredients from the rest of the wash.  The stuff you are straining into the still is a very weak and watery alcohol. The still evaporates the alcohol and separates the distillate into the pot. You will need to put the still over medium heat for an hour and let it work its magic. If you purchased a still from our recommended link above, your still will come with instructions on how to make everything happen.

COLLECTING YOUR BOURBON DISTILLATE

How To Make Bourbon Distillate Cuts

Now comes the delicate step of collecting your bourbon distillate.  This is where your practice and patience comes in very handy.  When you start the process of distilling your bourbon, you will collect the distillate in 4 stages.  The foreshots, heads, hearts, and tails.  Each of these stages will look, smell and taste differently.  Being able to detect the subtle changes between each of these 4 stages take lots of practice and experience.

FORESHOTS

First are the foreshots, which make up about 5% of your total distillate.  You will be collect and throw out this part of your bourbon distillate.  The reason?  Foreshots contain methanol, a toxic form of alcohol that should never be consumed.  This is due to the fact that it will make you go blind if you drink it.

HEADS

Next up are the heads.  The heads make up around 30% of your total distillate.  This part of your distillate will also be thrown out as they also contain toxic alcohols, such as methanol, acetaldehyde, and acetone.  These chemicals will also cause injury if consumed.  You can recognize this phase of your distillate by the solvent-y smell usually associated with rubbing alcohol.

HEARTS

The hearts are the area of your bourbon distillate that you should be aiming for.  These make up the next 30% of your bourbon distillate.  This is the sweet spot of your batch that is safe to consume.  The hearts are made up of mostly ethanol and can be recognized by their sweeter taste and neutral smell.  The part of your batch won’t have the chemically smell that the foreshots and heads had.  When you begin to notice that the solvent-y smell is gone and start to taste test your distillate, DO NOT swallow the liquid.  Instead simply taste a very small portion and spit it out, as you don’t want to accidentally consume any toxic elements that may still be distilling out of your batch.  The hearts are what you will be aging in the next step and turning into your batch of homemade bourbon.

TAILS

After the hearts have been collected you will notice that your distillate becomes more bitter than sweet and will have an oily residue that sits atop the liquid.  This portion of your distillate is known as the tails.  It will comprise about 35% of your total batch and can be reused for your next batch of bourbon distillate.  The tails contain chemicals such as propanol, butanol, acetic acid, and fusel alcohols.  These are what cause the steep decline in sweetness that you can use to detect this stage of your distillate.  Collect the tails and save them to be used during your next distillation.

AGING BOURBON AT HOME

How To Make Bourbon Aging Barrels

You should now have a nice ‘white dog’ (aka moonshine) that you can drink or age. I HIGHLY recommend aging your concoction in one of the small barrels listed above. Why? Because un-aged spirits are for un-aged drinkers.

The aging process takes a lot less time since there is a smaller bourbon to barrel surface area. Add charred oak chips (or some spices if you like)  and voila. You are aging bourbon like a boss!

Good homemade bourbon takes time to age.  You’ll want to age your bourbon batch for at least three months.  If you’re the extra patient type you could age your bourbon for years.  This will allow the oak flavors from the barrel to fully saturate your bourbon distillate.  For instance, Booker’s Bourbon is aged 6 to 8 years and it is an absolutely astonishing bourbon.  Either way you wish to experiment, you’ll be happy that you decided to make your own homemade bourbon.

This isn’t the easiest process, and you will have to trust yourself and your The Joy of Home Distilling.  But once you take that first sip of your very own concoction, the effort and the wait will be worth your while!

If you have any questions, comments, advice, or if you have tried your hand at home distilling, leave us a comment below.

What did you think of our guide on making your own homemade bourbon?  Leave your rating below…

4.3/5 - (346 votes)

The post HOW TO MAKE BOURBON AT HOME: A GUIDE FOR MAKING GREAT WHISKEY appeared first on Bourbon Of The Day.

HOW TO MAKE BOURBON AT HOME: A GUIDE FOR MAKING GREAT WHISKEY

HOW TO MAKE BOURBON AT HOME: A GUIDE FOR MAKING GREAT WHISKEY ***Before we get started, let me get this out of the way: It is illegal to distill spirits at home. Not because it is dangerous to do so, but because over half the retail price of a bottle […]

The post HOW TO MAKE BOURBON AT HOME: A GUIDE FOR MAKING GREAT WHISKEY appeared first on Bourbon Of The Day.

HOW TO MAKE
BOURBON AT HOME:
A GUIDE FOR MAKING
GREAT WHISKEY

***Before we get started, let me get this out of the way: It is illegal to distill spirits at home. Not because it is dangerous to do so, but because over half the retail price of a bottle of distilled spirits consists of taxes.

Taxes on beer and wine are low compared to the very high taxes imposed on whiskey, vodka, gin, and all other distilled spirits, and the government doesn’t want to lose any of the many billions of dollars it receives each and every year by letting you make your own bourbon.  The law will come after you if they think you are making bourbon or any other spirits. Therefore, this article is for entertainment purposes only. It’s only wrong if you get caught.***

One of the most frequent questions we get from our Bourbon Of The Day email subscribers is whether its possible to make bourbon at home. Beer is going crazy right now, with previously unknown operations creating their own funky-named brews on a damned near daily basis.

While any old college kid can make a batch of stout, it takes a little more time, effort, and some specialized items to make bourbon at home. For starters, you may want to pick up a copy of  The Joy of Home Distilling. This book provides most of the information that you will find below.

If you want to go above and beyond the beer boys, roll up your sleeves and try your hand at making bourbon at home!

Browse By Step.  Click on any of these links to jump to the step you want to see:
Homemade Bourbon Recipe Ingredients
How To Make Bourbon Mash
Fermenting Your Bourbon Mash
Distilling Your Homemade Bourbon
Collecting Your Bourbon Distillate
Ageing Your Bourbon At Home

HOMEMADE BOURBON RECIPE INGREDIENTS

You will need a few items to pull this off – all of which are readily available online. Here is the shopping list I used.

BOURBON WHISKEY HARDWARE

HOMEMADE BOURBON MASH MIX

HOW TO MAKE BOURBON MASH

A mash is just that – grains mashed up into a nice primordial bourbon stew. To create your own bourbon mash, you will need some grain. A traditional bourbon mash combines corn, rye, and barley or wheat, so that’s what we will be using for our mash bill.

Play around with the grain ratio’s, but for instructional purposes, we recommend 70% corn, 15% rye, and 15% wheat (or 15% barley instead).  Using wheat will give your bourbon a more mild flavor profile.

Throw both the corn and rye grains into your Corona corn and grain mill. It will take three passes to get the mill texture that you are looking for.  You’ll add the barley or wheat mix separately from the other grains.

How To Make Bourbon Ingredients Rye
0%
RYE
How To Make Bourbon Ingredients Corn
0%
CORN
How To Make Bourbon Ingredients Wheat
0%
WHEAT

After you have your grains all pulverized, put 5.5 gallons of water into your 10-gallon brew pot.  Bring the water to boil at 212 degrees and turn off the heating source. Begin stirring in your grain mix.  Stir continuously for around 8 minutes.

After stirring check the temperature of the water every 30-60 seconds and once it reaches 150 degrees pour in your 1.5 lbs of barley or wheat.

Once the mixture gets to 86 degrees, add one pack of that distiller’s yeast while giving the mix a stir. Keep stirring for a few minutes to make sure the yeast is playing nice with your bourbon mash.

What you should be looking at is a nice pot full of dough-like substance that smells like cornbread.

FERMENTING YOUR BOURBON MASH 

Now its time to ferment! Put your mash into those two 5 gallon jugs or the fermentation bucket that you purchased above (you will have to split the mix up). Seal them up and put the jugs somewhere to ferment for about 2 weeks.

When 10 – 14 days have passed, grab your nut milk bags and strain the mixture into your copper still.

This is where the magic happens.

(…dum dum dum dum da da da dum dum dum…)

INTO YOUR BOURBON STILL KIT

The hard part is over, but you ain’t ready to get red-faced just yet.  You’ll need to use your cheesecloth to filter the solid mash ingredients from the rest of the wash.  The stuff you are straining into the still is a very weak and watery alcohol. The still evaporates the alcohol and separates the distillate into the pot. You will need to put the still over medium heat for an hour and let it work its magic. If you purchased a still from our recommended link above, your still will come with instructions on how to make everything happen.

COLLECTING YOUR BOURBON DISTILLATE

How To Make Bourbon Distillate Cuts

Now comes the delicate step of collecting your bourbon distillate.  This is where your practice and patience comes in very handy.  When you start the process of distilling your bourbon, you will collect the distillate in 4 stages.  The foreshots, heads, hearts, and tails.  Each of these stages will look, smell and taste differently.  Being able to detect the subtle changes between each of these 4 stages take lots of practice and experience.

FORESHOTS

First are the foreshots, which make up about 5% of your total distillate.  You will be collect and throw out this part of your bourbon distillate.  The reason?  Foreshots contain methanol, a toxic form of alcohol that should never be consumed.  This is due to the fact that it will make you go blind if you drink it.

HEADS

Next up are the heads.  The heads make up around 30% of your total distillate.  This part of your distillate will also be thrown out as they also contain toxic alcohols, such as methanol, acetaldehyde, and acetone.  These chemicals will also cause injury if consumed.  You can recognize this phase of your distillate by the solvent-y smell usually associated with rubbing alcohol.

HEARTS

The hearts are the area of your bourbon distillate that you should be aiming for.  These make up the next 30% of your bourbon distillate.  This is the sweet spot of your batch that is safe to consume.  The hearts are made up of mostly ethanol and can be recognized by their sweeter taste and neutral smell.  The part of your batch won’t have the chemically smell that the foreshots and heads had.  When you begin to notice that the solvent-y smell is gone and start to taste test your distillate, DO NOT swallow the liquid.  Instead simply taste a very small portion and spit it out, as you don’t want to accidentally consume any toxic elements that may still be distilling out of your batch.  The hearts are what you will be aging in the next step and turning into your batch of homemade bourbon.

TAILS

After the hearts have been collected you will notice that your distillate becomes more bitter than sweet and will have an oily residue that sits atop the liquid.  This portion of your distillate is known as the tails.  It will comprise about 35% of your total batch and can be reused for your next batch of bourbon distillate.  The tails contain chemicals such as propanol, butanol, acetic acid, and fusel alcohols.  These are what cause the steep decline in sweetness that you can use to detect this stage of your distillate.  Collect the tails and save them to be used during your next distillation.

AGING BOURBON AT HOME

How To Make Bourbon Aging Barrels

You should now have a nice ‘white dog’ (aka moonshine) that you can drink or age. I HIGHLY recommend aging your concoction in one of the small barrels listed above. Why? Because un-aged spirits are for un-aged drinkers.

The aging process takes a lot less time since there is a smaller bourbon to barrel surface area. Add charred oak chips (or some spices if you like)  and voila. You are aging bourbon like a boss!

Good homemade bourbon takes time to age.  You’ll want to age your bourbon batch for at least three months.  If you’re the extra patient type you could age your bourbon for years.  This will allow the oak flavors from the barrel to fully saturate your bourbon distillate.  For instance, Booker’s Bourbon is aged 6 to 8 years and it is an absolutely astonishing bourbon.  Either way you wish to experiment, you’ll be happy that you decided to make your own homemade bourbon.

This isn’t the easiest process, and you will have to trust yourself and your The Joy of Home Distilling.  But once you take that first sip of your very own concoction, the effort and the wait will be worth your while!

If you have any questions, comments, advice, or if you have tried your hand at home distilling, leave us a comment below.

What did you think of our guide on making your own homemade bourbon?  Leave your rating below…

4.3/5 - (346 votes)

The post HOW TO MAKE BOURBON AT HOME: A GUIDE FOR MAKING GREAT WHISKEY appeared first on Bourbon Of The Day.

HOW TO HOST A PRIVATE BOURBON TASTING AT HOME

HOW TO HOST A PRIVATE BOURBON TASTING AT HOME No matter what time of year, gatherings of family and friends in the winter or during the summer present the bourbon enthusiast with a great opportunity to show off ones knowledge, wares, and fine whiskey. If done properly, a private bourbon […]

The post HOW TO HOST A PRIVATE BOURBON TASTING AT HOME appeared first on Bourbon Of The Day.

Rate this post

HOW TO HOST A PRIVATE
BOURBON TASTING AT HOME

No matter what time of year, gatherings of family and friends in the winter or during the summer present the bourbon enthusiast with a great opportunity to show off ones knowledge, wares, and fine whiskey. If done properly, a private bourbon tasting at home will thrill your guests and have them talking for months to come.

Here’s how to do it right!

GET THE RIGHT TOOLS

Unless you are planning on serving your bourbon in Styrofoam cups to a bunch of frat boys (no offense, I know some fairly classy frat boys), you want to make sure you have the right tools to accommodate your guests.

CRAFTING TOOLS

For an at home tasting, you wont need the tools that we as bartenders use, but if you are planning to craft cocktails, you will need a few tools. These include a metal shaker with a tight-fitting top covering a strainer which fits onto a bar tin, a julep strainer – a perforated over-sized soup spoon with holes, and a jigger. Jiggers are important here, since they ensure precise measurement of bourbon pours. This will save you money, prevent you from running out of bourbon too quickly, and will keep your pours clean.

These tools are all available at most liquor or major department stores. Rather than buying these items in pieces, you can save time and money by picking up an entire Oggi Pro Stainless-Steel 10-Piece Cocktail Shaker and Bar Tool Set. They look great, last a lifetime, and are easy to clean and maintain.

GLASSWARE

We have talked about the importance of glassware to the bourbon tasting experience in previous articles. When served neat, proper glassware captures and releases the aroma of your bourbon better than wide-mouthed glasses. Of course any glass will do, but the only one I can put my vote behind is the Glencairn. You can pick up a set of 6 traditional Glencairn whiskey glasses, or set of 4 Riedel Vinum whiskey glasses.

WHISKEY STONES OR BOURBON ICE BALLS

Whiskey Stones are odorless, tasteless, solid cubes that are usually made of soapstone that will chill your liquor without diluting it or interrupting its taste.

For higher proof whiskeys, you may actually want some dilution with slow melting bourbon ice balls. Theres no secret to making bourbon ice balls – all one needs is a mold.  You can easily pick up a set of cocktail ice molds here.

FIND GREAT FOOD PAIRINGS

Depending on how extensive your tasting will be, you may want to pair your bourbons with some nice appetizers, a main course, and maybe even some desert.

HORS D’OEUVRES

Hors d’oeuvres is the French word for appetizer, and are meant to sustain your guest while they meet and greet one another before the tasting begins. Hors d’oeuvres can also serve to stimulate the appetite, just as apéritifs do when served before meals.

If you are planning on hosting a short tasting, hors d’oeuvres should be enough to please your guests. But not just any appetizers will do; there are some that pair better with bourbon than others, and finding the right match can be tricky. You want appetizers that both compliment the flavors already present in the bourbon without diminishing their own flavor profiles. For starters, experiment with sushi, cheeses (particularly sharp cheddar), unsalted cracker, and dried fruits.

Hors d’oeuvres can also cleanse the palate between tastings, and add brand new dimensions to the bourbon tasting. Try sipping your favorite bourbon, then chewing a piece of dried cranberry or walnut and sipping again. Notice the difference in the structure of the bourbon, and how new flavors are expressed that may have initially been subtle or overpowering. Have your guests try this as well, and talk about your differences in perception.

MAIN COURSES

There is no limit t0 the variety of main courses that can be offered during a bourbon tasting. Four Roses, Woodford Reserve, and Buffalo Trace all suggest signature dishes that pair well with their particular brands. Start with their websites, or do a search for some recipe ideas. I have paired bourbons with everything from smoked salmon and fried chicken to rib eye steaks and shrimp and grits. For starters, I found this amazing Makers Mark Bourbon BBQ Ribs recipe via BourbonBlog.Com. It goes a little something like this:

Makers Mark Bourbon BBQ Ribs Recipe

Bourbon BBQ Ribs Recipe

Prep Time: 24 hours/day beforehand
Cook Time: 5 hours
Level: Easy
(Serves 4-6)

2 cups Makers Mark
1 bunch cilantro – cleaned and roughly chopped
4 cloves garlic, peeled and minced
¼ cup fresh ginger, peeled and chopped
1 tablespoon coriander seeds
1 tablespoon mustard seeds
1 teaspoon ground cumin
1 teaspoon cayenne
1 teaspoon curry powder
1 tablespoon Dijon mustard
¼ cup dark brown sugar
2 tablespoons kosher salt
1 rack of peeled pork spare ribs
3 tablespoons butter
½ white onion, peeled and diced ½”
1 cup pineapple juice
1 cup tomato juice
1 cup ketchup
1 cup water
Fresh cilantro leaves, for garnish
Fresh red radish, for garnish

Instructions:

  1. In a large bowl, mix the Maker’s Mark®, cilantro, garlic, ginger, garlic, cumin, cayenne, curry, mustard seeds, Dijon and brown sugar and salt until well combined. Pour into a shallow baking dish. Submerge the full rack of ribs in the marinade and refrigerate over night.
  2. Preheat the oven to 400°F. After 24 hours, remove the ribs, brushing off any excess marinade and spices (reserve the marinade for the barbecue sauce), and place on baking sheet and roast in the oven for 45 minutes. Remove the rack from the oven, wrap the ribs tightly in foil and cool in the refrigerator for at least 3 hours.
  3. Heat the butter in a medium saucepan over medium-high heat. Add the diced onion and cook for 10 minutes, stirring often. Add the marinade liquid and all of its components, the pineapple and tomato juice, ketchup, and water. Cook this mixture for 45 minutes on a medium simmer, stirring occasionally.
  4. When the ribs have cooled down, slice them in between each bone to separate them from the rack and place in a large mixing bowl. Strain the barbecue sauce through a fine mesh sieve and pour over the ribs, tossing to thoroughly coat them.
  5. Place the individual ribs in a single layer in an ample-sized baking dish, pouring the excess barbecue sauce over the ribs, and return to the oven. Lower the heat on the oven to 350°F and bake for an additional hour, turning the ribs occasionally to insure sauce coverage.
  6. The ribs will be tender and the sauce should glaze the ribs during the baking process. Serve hot with picked cilantro leaves, thinly sliced radishes, and Maker’s Mark “chilled neat”
You can also keep it simple, and offer your guests a bourbon and a burger – a pairing that Dish on Market in Louisville, Kentucky has become known for.

DESSERTS

Chocolate, toffee, vanilla, and molasses all go particularly well with bourbons. And hey, who doesn’t like desert? “Try Four Roses Limited Edition 2011 with a warm chocolate cake,” says Kentucky-based chef Jonathan Lundy. “Its strong cocoa scent is perfect.”

If you decide to do chocolates as stand alone rather than in recipes, don’t pair cheap, store bought chocolates with a fine bottle of bourbon. Like whiskeys, there are some nice, moderately priced, high class desert chocolates on the market. Try Nestle’s English Imported Black Magic Chocolates, Cellas Dark Chocolate Covered Cherries, or if you are really aiming to please, shell out for some hand crafted Vosges Haut-Chocolat. You could also combine both bourbon and chocolate with some Woodford Reserve Bourbon Balls.

TALK YOUR GUESTS THROUGH THE TASTING

Before your tasting, take some time to learn about the bourbons you are serving. While its important to know and understand the basics of bourbon, what makes the tasting fun are the little known facts that one discovers when learning about their favorite bottles. Also, understand that no two palates are the same. As you taste your bourbon, talk about the different flavors others perceive as they imbibe, and see if you can identify the same ones.

If you know a bartender who is particularly knowledgeable (and well mannered) , you may want to invite them to the tasting to assist you in a professional capacity. Many bartenders who are dedicated to their craft are more than willing to lend a hand – myself included.

Have you ever done a tasting at home? If not, are you planning on doing so in the future? Leave us a comment below and let us know what you think, advice on food pairings, and experiences you have had at tastings in the past!

Cheers!

-Demitrius

The post HOW TO HOST A PRIVATE BOURBON TASTING AT HOME appeared first on Bourbon Of The Day.

HOW TO HOST A PRIVATE BOURBON TASTING AT HOME

HOW TO HOST A PRIVATE BOURBON TASTING AT HOME No matter what time of year, gatherings of family and friends in the winter or during the summer present the bourbon enthusiast with a great opportunity to show off ones knowledge, wares, and fine whiskey. If done properly, a private bourbon […]

The post HOW TO HOST A PRIVATE BOURBON TASTING AT HOME appeared first on Bourbon Of The Day.

Rate this post

HOW TO HOST A PRIVATE
BOURBON TASTING AT HOME

No matter what time of year, gatherings of family and friends in the winter or during the summer present the bourbon enthusiast with a great opportunity to show off ones knowledge, wares, and fine whiskey. If done properly, a private bourbon tasting at home will thrill your guests and have them talking for months to come.

Here’s how to do it right!

GET THE RIGHT TOOLS

Unless you are planning on serving your bourbon in Styrofoam cups to a bunch of frat boys (no offense, I know some fairly classy frat boys), you want to make sure you have the right tools to accommodate your guests.

CRAFTING TOOLS

For an at home tasting, you wont need the tools that we as bartenders use, but if you are planning to craft cocktails, you will need a few tools. These include a metal shaker with a tight-fitting top covering a strainer which fits onto a bar tin, a julep strainer – a perforated over-sized soup spoon with holes, and a jigger. Jiggers are important here, since they ensure precise measurement of bourbon pours. This will save you money, prevent you from running out of bourbon too quickly, and will keep your pours clean.

These tools are all available at most liquor or major department stores. Rather than buying these items in pieces, you can save time and money by picking up an entire Oggi Pro Stainless-Steel 10-Piece Cocktail Shaker and Bar Tool Set. They look great, last a lifetime, and are easy to clean and maintain.

GLASSWARE

We have talked about the importance of glassware to the bourbon tasting experience in previous articles. When served neat, proper glassware captures and releases the aroma of your bourbon better than wide-mouthed glasses. Of course any glass will do, but the only one I can put my vote behind is the Glencairn. You can pick up a set of 6 traditional Glencairn whiskey glasses, or set of 4 Riedel Vinum whiskey glasses.

WHISKEY STONES OR BOURBON ICE BALLS

Whiskey Stones are odorless, tasteless, solid cubes that are usually made of soapstone that will chill your liquor without diluting it or interrupting its taste.

For higher proof whiskeys, you may actually want some dilution with slow melting bourbon ice balls. Theres no secret to making bourbon ice balls – all one needs is a mold.  You can easily pick up a set of cocktail ice molds here.

FIND GREAT FOOD PAIRINGS

Depending on how extensive your tasting will be, you may want to pair your bourbons with some nice appetizers, a main course, and maybe even some desert.

HORS D’OEUVRES

Hors d’oeuvres is the French word for appetizer, and are meant to sustain your guest while they meet and greet one another before the tasting begins. Hors d’oeuvres can also serve to stimulate the appetite, just as apéritifs do when served before meals.

If you are planning on hosting a short tasting, hors d’oeuvres should be enough to please your guests. But not just any appetizers will do; there are some that pair better with bourbon than others, and finding the right match can be tricky. You want appetizers that both compliment the flavors already present in the bourbon without diminishing their own flavor profiles. For starters, experiment with sushi, cheeses (particularly sharp cheddar), unsalted cracker, and dried fruits.

Hors d’oeuvres can also cleanse the palate between tastings, and add brand new dimensions to the bourbon tasting. Try sipping your favorite bourbon, then chewing a piece of dried cranberry or walnut and sipping again. Notice the difference in the structure of the bourbon, and how new flavors are expressed that may have initially been subtle or overpowering. Have your guests try this as well, and talk about your differences in perception.

MAIN COURSES

There is no limit t0 the variety of main courses that can be offered during a bourbon tasting. Four Roses, Woodford Reserve, and Buffalo Trace all suggest signature dishes that pair well with their particular brands. Start with their websites, or do a search for some recipe ideas. I have paired bourbons with everything from smoked salmon and fried chicken to rib eye steaks and shrimp and grits. For starters, I found this amazing Makers Mark Bourbon BBQ Ribs recipe via BourbonBlog.Com. It goes a little something like this:

Makers Mark Bourbon BBQ Ribs Recipe

Bourbon BBQ Ribs Recipe

Prep Time: 24 hours/day beforehand
Cook Time: 5 hours
Level: Easy
(Serves 4-6)

2 cups Makers Mark
1 bunch cilantro – cleaned and roughly chopped
4 cloves garlic, peeled and minced
¼ cup fresh ginger, peeled and chopped
1 tablespoon coriander seeds
1 tablespoon mustard seeds
1 teaspoon ground cumin
1 teaspoon cayenne
1 teaspoon curry powder
1 tablespoon Dijon mustard
¼ cup dark brown sugar
2 tablespoons kosher salt
1 rack of peeled pork spare ribs
3 tablespoons butter
½ white onion, peeled and diced ½”
1 cup pineapple juice
1 cup tomato juice
1 cup ketchup
1 cup water
Fresh cilantro leaves, for garnish
Fresh red radish, for garnish

Instructions:

  1. In a large bowl, mix the Maker’s Mark®, cilantro, garlic, ginger, garlic, cumin, cayenne, curry, mustard seeds, Dijon and brown sugar and salt until well combined. Pour into a shallow baking dish. Submerge the full rack of ribs in the marinade and refrigerate over night.
  2. Preheat the oven to 400°F. After 24 hours, remove the ribs, brushing off any excess marinade and spices (reserve the marinade for the barbecue sauce), and place on baking sheet and roast in the oven for 45 minutes. Remove the rack from the oven, wrap the ribs tightly in foil and cool in the refrigerator for at least 3 hours.
  3. Heat the butter in a medium saucepan over medium-high heat. Add the diced onion and cook for 10 minutes, stirring often. Add the marinade liquid and all of its components, the pineapple and tomato juice, ketchup, and water. Cook this mixture for 45 minutes on a medium simmer, stirring occasionally.
  4. When the ribs have cooled down, slice them in between each bone to separate them from the rack and place in a large mixing bowl. Strain the barbecue sauce through a fine mesh sieve and pour over the ribs, tossing to thoroughly coat them.
  5. Place the individual ribs in a single layer in an ample-sized baking dish, pouring the excess barbecue sauce over the ribs, and return to the oven. Lower the heat on the oven to 350°F and bake for an additional hour, turning the ribs occasionally to insure sauce coverage.
  6. The ribs will be tender and the sauce should glaze the ribs during the baking process. Serve hot with picked cilantro leaves, thinly sliced radishes, and Maker’s Mark “chilled neat”
You can also keep it simple, and offer your guests a bourbon and a burger – a pairing that Dish on Market in Louisville, Kentucky has become known for.

DESSERTS

Chocolate, toffee, vanilla, and molasses all go particularly well with bourbons. And hey, who doesn’t like desert? “Try Four Roses Limited Edition 2011 with a warm chocolate cake,” says Kentucky-based chef Jonathan Lundy. “Its strong cocoa scent is perfect.”

If you decide to do chocolates as stand alone rather than in recipes, don’t pair cheap, store bought chocolates with a fine bottle of bourbon. Like whiskeys, there are some nice, moderately priced, high class desert chocolates on the market. Try Nestle’s English Imported Black Magic Chocolates, Cellas Dark Chocolate Covered Cherries, or if you are really aiming to please, shell out for some hand crafted Vosges Haut-Chocolat. You could also combine both bourbon and chocolate with some Woodford Reserve Bourbon Balls.

TALK YOUR GUESTS THROUGH THE TASTING

Before your tasting, take some time to learn about the bourbons you are serving. While its important to know and understand the basics of bourbon, what makes the tasting fun are the little known facts that one discovers when learning about their favorite bottles. Also, understand that no two palates are the same. As you taste your bourbon, talk about the different flavors others perceive as they imbibe, and see if you can identify the same ones.

If you know a bartender who is particularly knowledgeable (and well mannered) , you may want to invite them to the tasting to assist you in a professional capacity. Many bartenders who are dedicated to their craft are more than willing to lend a hand – myself included.

Have you ever done a tasting at home? If not, are you planning on doing so in the future? Leave us a comment below and let us know what you think, advice on food pairings, and experiences you have had at tastings in the past!

Cheers!

-Demitrius

The post HOW TO HOST A PRIVATE BOURBON TASTING AT HOME appeared first on Bourbon Of The Day.

BITTERS: BEYOND THE BAR

BITTERS: BEYOND THE BAR Its no secret that we here at Bourbon of the Day are big fans of bitters. But for new bourbon enthusiasts or traditionalists who prefer their whiskeys neat, buying bitters you might not enjoy means running the risk of having half used bottles sitting on your […]

The post BITTERS: BEYOND THE BAR appeared first on Bourbon Of The Day.

Rate this post

BITTERS: BEYOND THE BAR

Its no secret that we here at Bourbon of the Day are big fans of bitters. But for new bourbon enthusiasts or traditionalists who prefer their whiskeys neat, buying bitters you might not enjoy means running the risk of having half used bottles sitting on your shelf.

Fear not! There are hundreds of ways to get the most use out of every bottle of bitters that you purchased! Just a few dashes of bitters in food recipes can transform ordinary dishes into extraordinary ones. In Trinidad and Tobago, bitters are often essential ingredients in soups, stews, and curries, and a growing number of restaurants and coffee shops are distinguishing themselves from the competition with non-alcoholic beverage, entrée, and desert recipes featuring unique bitters blends.

BETTER BEVERAGES WITH BITTERS

Bitters gained popularity as cocktail ingredients during the Prohibition Era. “Today`s distilled spirits are made under strict quality-control procedures to have a smooth finish,” Angostura President Robert Hanson notes. “Years ago, spirits were homemade as often as they were commercially distilled. Bitters made raw, harsh-tasting alcohol into a more palatable drink.” That was then, this is now, and bitters isn’t just for spirits anymore! If you love orange juice, a few drops of orange bitters can tame its acidity, and a few drops in an iced coffee, lemonade, ginger ale, tonic water, or club soda can work wonders.

In fact,  Angostura currently markets their bitters in a drink called the Charger-a few dashes in a glass of sparkling water garnished with a wedge of lime juice. “It’s a popular alternative to cocktails for people who enjoy something more sophisticated than a soft drink,” Hanson says. Angostura and Canada Dry have even teamed up to popularize the Charger through radio advertising and sample promotions. And when the Minneapolis Star-Tribune newspaper asked its readers for suggestions on how to improve new Coca-Cola to make it taste more like old Coke, a reader nominated Angostura as the missing secret ingredient.

BITTERS + DINNER = WINNER

While bitters work beautifully in drinks and cocktails, they can be brilliant when used in place of the usual soup, salad, entrée, and desert ingredients. To get your creative juices flowing, here are 4 of the easies and the best recipes around for a spectacular 4 course meal!

Squash and Bitters Soup (Serves 8)

  • 2 tablespoons unsalted butter
  • 2 large leeks, white and pale green parts only, finely chopped
  • 1 (3 lb) winter squash, such as kobucha, butternut, or pumpkin
  • 1 qt chicken stock or low sodium chicken broth
  • 2 cups water
  • 2 tablespoons bitters
  • 2 tablespoons light brown sugar
  • 1 teaspoon fine sea salt
  • 3/4 teaspoon finely ground black pepper
  • 1/3 cup heavy cream

Peel and seed squash, then cut into two-inch chunks. Heat butter in a large heavy pot over medium heat until hot. Stir in leeks and garlic, and cook, stirring occasionally, until leeks are translucent, about six minutes. Stir in squash, stock, water, bitters, sugar, salt, and pepper, and bring to a boil. Cook soup, uncovered, until squash is very tender (about 25 minutes). Transfer soup to a blender and purée in batches. Season with salt and pepper to taste and serve drizzled with cream and additional bitters if you’re feeling frisky.

Bitters Honey Vinaigrette Salad Dressing

  • 1/4 cup vegetable oil
  • 3 Tbsp. honey
  • 1 Tbsp. chopped fresh mint
  • 2 tsp. bitters
  • 1/4 tsp. each salt and pepper

Whisk together ingredients. Toss with mixed salad greens. Especially tasty with salads containing spinach, kale, arugula and other slightly bitter greens.

Beef and Bitters Stew (Serves 6)

  • 3 tablespoons olive oil or unsalted butter
  • 2 lb beef chuck, cut into cubes
  • 1 1/2 teaspoons fine sea salt
  • 1 teaspoon finely ground black pepper
  • 3 medium onions, sliced
  • 1 qt chicken stock or low-sodium broth
  • 1 cup crushed tomatoes
  • 3 tablespoons bitters
  • 1 tablespoon extra-virgin olive oil
  • Sour cream

Heat 1 tablespoon oil in a large heavy skillet over high heat until hot. Sprinkle beef with 1 1/2 teaspoons salt and 1 teaspoon pepper, then sear beef, in batches, turning occasionally, until browned, about eight minutes total. Transfer beef to a medium heavy pot. Add remaining 2 tablespoons oil and onions to skillet with remaining 1/2 teaspoon salt and cook, stirring frequently and reducing heat as necessary, until onions are deep golden, 35 to 40 minutes. Add chicken stock to skillet, scraping up any browned bits, then transfer to pot with beef. Stir in bitters and bay and bring to a simmer. Simmer stew, partially covered, until beef is very tender, about three hours. Season with salt and pepper to taste. Serve stew topped with sour cream.

Pineapple Upside-Down Cake

Pineapple Upside Down Cake

  • 12 tbsp unsalted butter, softened, plus more for pan
  • 1/2 c. packed brown sugar
  • 3-4 dashes Angostura bitters
  • 6 pineapple rings (canned, juice reserved)
  • Maraschino cherries
  • 1 c. granulated sugar
  • 1 1/2 c. flour heaping
  • 1/2 tsp salt heaping
  • 1/4 tsp baking soda heaping
  • 1/4 tsp baking powder
  • 2 eggs
  • 1/4 c. Greek yogurt
  • 4 tsp pineapple juice (reserved from the pineapple ring can)

Heat oven to 350F. Butter an 8″ square pan, line with a square of parchment paper, and butter the parchment. Cream 2 tbsps of the butter, all of the brown sugar, and 3 dashes bitters in a small bowl. Microwave the mixture for 5 seconds to soften it up and spread into the prepared pan. Place pineapple rings and Maraschino cherries as desired on top of the butter mixture.

In the bowl of a stand mixer (or by hand if you’d like), beat the 10 tbsp butter with granulated sugar for several minutes, until light, fluffy and fully mixed. Meanwhile, sift together flour, salt, baking soda, and baking powder in a medium bowl. When the butter mixture is fully incorporated, add eggs one at a time, beating well after each addition. Add flour mixture in two parts, alternating with the Greek yogurt, pineapple juice, and bitters.

Pour batter into pan over fruit, spreading evenly with a spatula, pushing batter into the corners and along the pan’s edges. Bake for 50-60 minutes, rotating once, until cake is caramelized and golden brown on the edges, and cooked through. Remove from oven, and set on a cooling rack for 30-45 minutes. When cool, turn out onto a plate, remove parchment paper, and serve. The juicy sweetness of the canned pineapple and maraschino cherries paired with Angostura bitters will blow your mind!

While you can use any bitters you want in the above recipes, here are the 4 we recommend. Just click the link to check out prices, customer reviews, and grab a bottle of your own:

Cheers!

+Demitrius

The post BITTERS: BEYOND THE BAR appeared first on Bourbon Of The Day.

BITTERS: BEYOND THE BAR

BITTERS: BEYOND THE BAR Its no secret that we here at Bourbon of the Day are big fans of bitters. But for new bourbon enthusiasts or traditionalists who prefer their whiskeys neat, buying bitters you might not enjoy means running the risk of having half used bottles sitting on your […]

The post BITTERS: BEYOND THE BAR appeared first on Bourbon Of The Day.

Rate this post

BITTERS: BEYOND THE BAR

Its no secret that we here at Bourbon of the Day are big fans of bitters. But for new bourbon enthusiasts or traditionalists who prefer their whiskeys neat, buying bitters you might not enjoy means running the risk of having half used bottles sitting on your shelf.

Fear not! There are hundreds of ways to get the most use out of every bottle of bitters that you purchased! Just a few dashes of bitters in food recipes can transform ordinary dishes into extraordinary ones. In Trinidad and Tobago, bitters are often essential ingredients in soups, stews, and curries, and a growing number of restaurants and coffee shops are distinguishing themselves from the competition with non-alcoholic beverage, entrée, and desert recipes featuring unique bitters blends.

BETTER BEVERAGES WITH BITTERS

Bitters gained popularity as cocktail ingredients during the Prohibition Era. “Today`s distilled spirits are made under strict quality-control procedures to have a smooth finish,” Angostura President Robert Hanson notes. “Years ago, spirits were homemade as often as they were commercially distilled. Bitters made raw, harsh-tasting alcohol into a more palatable drink.” That was then, this is now, and bitters isn’t just for spirits anymore! If you love orange juice, a few drops of orange bitters can tame its acidity, and a few drops in an iced coffee, lemonade, ginger ale, tonic water, or club soda can work wonders.

In fact,  Angostura currently markets their bitters in a drink called the Charger-a few dashes in a glass of sparkling water garnished with a wedge of lime juice. “It’s a popular alternative to cocktails for people who enjoy something more sophisticated than a soft drink,” Hanson says. Angostura and Canada Dry have even teamed up to popularize the Charger through radio advertising and sample promotions. And when the Minneapolis Star-Tribune newspaper asked its readers for suggestions on how to improve new Coca-Cola to make it taste more like old Coke, a reader nominated Angostura as the missing secret ingredient.

BITTERS + DINNER = WINNER

While bitters work beautifully in drinks and cocktails, they can be brilliant when used in place of the usual soup, salad, entrée, and desert ingredients. To get your creative juices flowing, here are 4 of the easies and the best recipes around for a spectacular 4 course meal!

Squash and Bitters Soup (Serves 8)

  • 2 tablespoons unsalted butter
  • 2 large leeks, white and pale green parts only, finely chopped
  • 1 (3 lb) winter squash, such as kobucha, butternut, or pumpkin
  • 1 qt chicken stock or low sodium chicken broth
  • 2 cups water
  • 2 tablespoons bitters
  • 2 tablespoons light brown sugar
  • 1 teaspoon fine sea salt
  • 3/4 teaspoon finely ground black pepper
  • 1/3 cup heavy cream

Peel and seed squash, then cut into two-inch chunks. Heat butter in a large heavy pot over medium heat until hot. Stir in leeks and garlic, and cook, stirring occasionally, until leeks are translucent, about six minutes. Stir in squash, stock, water, bitters, sugar, salt, and pepper, and bring to a boil. Cook soup, uncovered, until squash is very tender (about 25 minutes). Transfer soup to a blender and purée in batches. Season with salt and pepper to taste and serve drizzled with cream and additional bitters if you’re feeling frisky.

Bitters Honey Vinaigrette Salad Dressing

  • 1/4 cup vegetable oil
  • 3 Tbsp. honey
  • 1 Tbsp. chopped fresh mint
  • 2 tsp. bitters
  • 1/4 tsp. each salt and pepper

Whisk together ingredients. Toss with mixed salad greens. Especially tasty with salads containing spinach, kale, arugula and other slightly bitter greens.

Beef and Bitters Stew (Serves 6)

  • 3 tablespoons olive oil or unsalted butter
  • 2 lb beef chuck, cut into cubes
  • 1 1/2 teaspoons fine sea salt
  • 1 teaspoon finely ground black pepper
  • 3 medium onions, sliced
  • 1 qt chicken stock or low-sodium broth
  • 1 cup crushed tomatoes
  • 3 tablespoons bitters
  • 1 tablespoon extra-virgin olive oil
  • Sour cream

Heat 1 tablespoon oil in a large heavy skillet over high heat until hot. Sprinkle beef with 1 1/2 teaspoons salt and 1 teaspoon pepper, then sear beef, in batches, turning occasionally, until browned, about eight minutes total. Transfer beef to a medium heavy pot. Add remaining 2 tablespoons oil and onions to skillet with remaining 1/2 teaspoon salt and cook, stirring frequently and reducing heat as necessary, until onions are deep golden, 35 to 40 minutes. Add chicken stock to skillet, scraping up any browned bits, then transfer to pot with beef. Stir in bitters and bay and bring to a simmer. Simmer stew, partially covered, until beef is very tender, about three hours. Season with salt and pepper to taste. Serve stew topped with sour cream.

Pineapple Upside-Down Cake

Pineapple Upside Down Cake

  • 12 tbsp unsalted butter, softened, plus more for pan
  • 1/2 c. packed brown sugar
  • 3-4 dashes Angostura bitters
  • 6 pineapple rings (canned, juice reserved)
  • Maraschino cherries
  • 1 c. granulated sugar
  • 1 1/2 c. flour heaping
  • 1/2 tsp salt heaping
  • 1/4 tsp baking soda heaping
  • 1/4 tsp baking powder
  • 2 eggs
  • 1/4 c. Greek yogurt
  • 4 tsp pineapple juice (reserved from the pineapple ring can)

Heat oven to 350F. Butter an 8″ square pan, line with a square of parchment paper, and butter the parchment. Cream 2 tbsps of the butter, all of the brown sugar, and 3 dashes bitters in a small bowl. Microwave the mixture for 5 seconds to soften it up and spread into the prepared pan. Place pineapple rings and Maraschino cherries as desired on top of the butter mixture.

In the bowl of a stand mixer (or by hand if you’d like), beat the 10 tbsp butter with granulated sugar for several minutes, until light, fluffy and fully mixed. Meanwhile, sift together flour, salt, baking soda, and baking powder in a medium bowl. When the butter mixture is fully incorporated, add eggs one at a time, beating well after each addition. Add flour mixture in two parts, alternating with the Greek yogurt, pineapple juice, and bitters.

Pour batter into pan over fruit, spreading evenly with a spatula, pushing batter into the corners and along the pan’s edges. Bake for 50-60 minutes, rotating once, until cake is caramelized and golden brown on the edges, and cooked through. Remove from oven, and set on a cooling rack for 30-45 minutes. When cool, turn out onto a plate, remove parchment paper, and serve. The juicy sweetness of the canned pineapple and maraschino cherries paired with Angostura bitters will blow your mind!

While you can use any bitters you want in the above recipes, here are the 4 we recommend. Just click the link to check out prices, customer reviews, and grab a bottle of your own:

Cheers!

+Demitrius

The post BITTERS: BEYOND THE BAR appeared first on Bourbon Of The Day.